Before using alcohol markers over pencil, finish corrections, remove unused construction lines and lighten the guides you still need. Decide whether those remaining lines belong in the finished drawing. A faint guide can help you place color, yet it may remain visible or move during a marker pass.
Practitioner advice supports preparing the drawing before color. The same-paper check below lets you examine your own materials before committing the final sheet. A pencil grade or pale line alone gives no guarantee of a clean result.
Key takeaways
- Choose a faint visible guide, a tested ink outline or a finish without a dark outline.
- Remove unwanted strokes and lighten useful guides as separate jobs.
- Compare the prepared areas with clean paper using your intended pale marker.
- Stop for gray drag, changed paper or ink transfer before adding more color.
Decide Whether the Pencil Lines Belong in the Finish
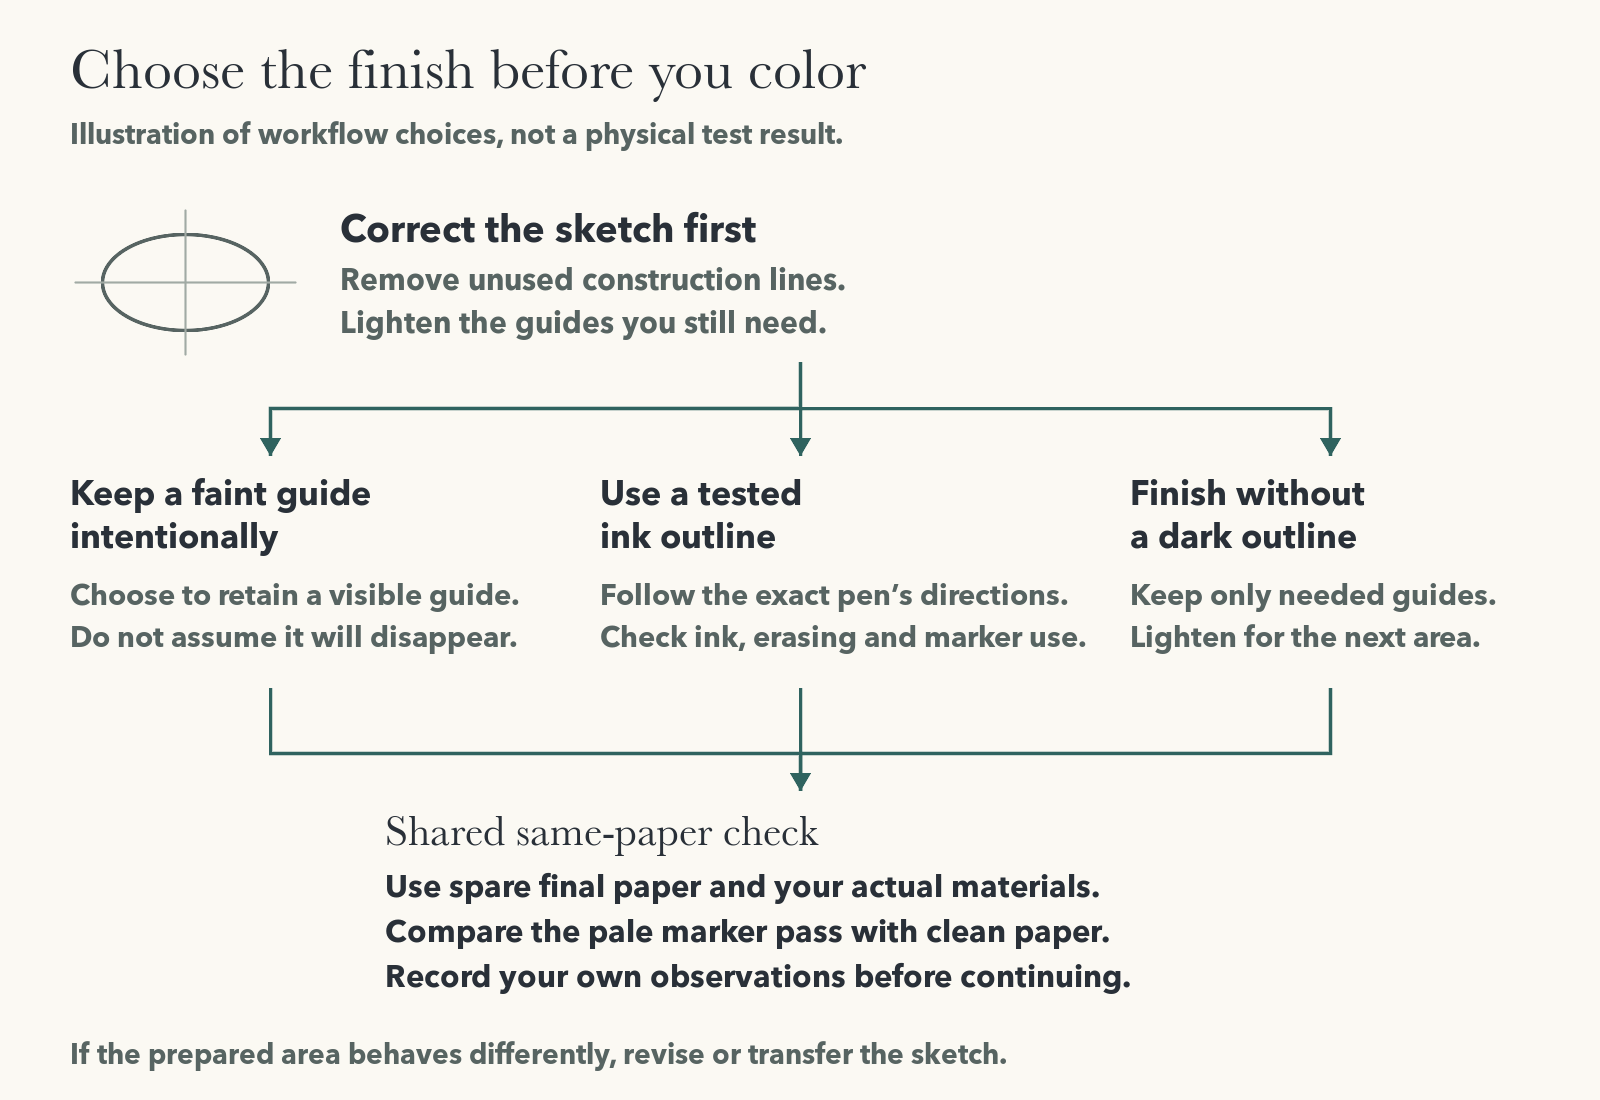
Choose the finish before erasing. The drawing needs enough information for you to place color, but every remaining mark should have a purpose.
| Intended finish | Pencil preparation | Check before color | Evidence limit |
|---|---|---|---|
| Faint guide left visible | Remove unused strokes and lighten needed lines | Check visibility and gray drag under the pale pass | Faint does not mean invisible or smear-free |
| Tested ink outline | Correct, ink, then check erasing under the pen maker's directions | Try the full ink, eraser and marker sequence | Compatibility belongs to the exact materials |
| No dark outline | Remove unused marks and lighten each area before coloring it | Check that useful guides remain readable without an unwanted border | No universal erasure amount is established |
Keep a faint guide intentionally
You can retain a light line as part of the drawing if its appearance suits the finish. Judge it under the planned color, rather than from the uncolored sketch alone. Pale areas deserve attention: a line you accept beside dark color may look distracting in a light area.
In Ohuhu's Halloween-card tutorial, created.by.katie_ begins with a light gray lead sketch. Published October 28, 2025 and checked October 13, 2026, it provides a project example. It sets no universal threshold for how faint your lines should be.
Use a tested ink outline
Settle the shapes before inking them. Follow the exact pen maker's directions, then check whether erasing the underlying sketch and adding marker disturb the ink. Use the order you intend for the final drawing.
Treat that sequence as one check. A pen line that survives an eraser still needs the marker pass. No fixed waiting interval covers every pen, paper and ink combination.
Finish without a dark outline
Lighten needed guides before coloring the next area. You don't have to erase the entire drawing at once and lose its placement information. Keep the marks needed to locate that area, then check their appearance under color.
This path leaves the boundary to your color work. If a remaining line would create an unwanted border, revise it before the colored pass.
Correct and Lighten the Sketch Before Color
Do the shape corrections first, then reduce the remaining marks. Erasing an unwanted stroke and lightening a useful guide serve different purposes.
Remove unused construction lines
Find doubled contours, abandoned shapes and planning marks that no longer locate anything. Remove them before deciding which guides to keep. Avoid retracing every corrected edge with another dark stroke.
Amy Shulke's Copic FAQ, updated March 2022 and checked October 13, 2026, advises light pressure and fewer sketch strokes. She recommends erasing unused strokes and minimizing details before color. The practical choice is to leave fewer marks needing correction.
Lighten the guides you still need
Use a kneaded eraser for controlled lifting. Shape it to reach the intended mark, dab, then inspect the line before lifting more. Stop when you can still read the guide needed for the next area.
Canson's eraser tutorial, checked October 13, 2026, describes shaping, dabbing and kneading the tool clean. It favors a conventional rubber eraser for graphite removal. Keep that removal task separate from selectively lightening a guide.
STAEDTLER's 5427 page, checked October 13, 2026, lists graphite lifting as a function. That documented example supplies no marker-compatibility guarantee. Sandy Allnock names a kneaded eraser for pencil removal on Neenah cardstock in her April 10, 2015 card tutorial, checked October 13, 2026. Her example stays tied to that project.
Check pressure and the paper surface
A lighter-looking mark and an unmarked surface are separate things to inspect. Look at corrected areas for a pressure groove or changed texture, even after graphite has been lifted. Shulke describes pressure scars and eraser residue as possible causes of different ink behavior.
STAEDTLER's pencil explanation, checked October 13, 2026, ties hardness to graphite and clay proportions. More clay gives a harder lead. More graphite gives a softer, blacker mark. That distinction supplies no universal H, 2H or HB recommendation for marker paper. Check the mark your actual pressure leaves.
Check the Prepared Sketch on the Same Paper
Use a spare piece of the final paper, your actual pencil and eraser, and the pale marker you intend to use. If paper selection is still open, the best paper for alcohol markers guide handles that decision. Use the chosen sheet for this preparation check.
Compare prepared marks with clean paper
Make a light guide and a small correction on the scrap. Leave one marked area untouched, lighten another and erase a third. Keep a nearby area free of pencil and eraser as the clean-paper control.
Clear loose debris gently before coloring. Note which area received which action so you can compare the result with its preparation. The untouched area helps show what changed after lifting or erasing.
Apply the intended pale marker pass
Apply the same pale marker across the marked, lightened, erased and clean areas. Keep the application alike enough to compare them. Inspect the prepared marks and the adjacent clean area before adding further layers.
For an inked finish, make a separate small outline and follow the pen's own directions. Try the full erasing and coloring sequence there. A successful pencil-only check leaves ink compatibility unanswered.
Record What Happened on Your Paper
Fill this checklist after your scrap-paper check, using what you observed. Keep the record with the drawing so a later change of pencil or paper is easy to spot.
- Materials: paper, pencil, eraser, pale marker and any outline pen.
- Preparation: which areas were untouched, lightened, erased or inked.
- Gray drag: whether gray spread beyond a guide during the pass.
- Visibility: whether the remaining line suits the intended finish.
- Surface: whether a groove or rough area remains.
- Ink transfer: whether the outline moved or left marks on the nib.
If a prepared area behaves differently from the control, change one variable and repeat the check. You might revise the lifting step or transfer a cleaner drawing. Choose a pencil for alcohol markers by the result on that paper, rather than by its grade alone.
Read the First Pale Pass Before You Continue
Identify the symptom before trying another correction. More color makes it harder to compare the original guide with the first pass.
Gray drag or a visible pencil guide
A line visible through color does not by itself show that graphite moved. Compare its location with the guide. Gray extending beyond it is a separate observation worth recording.
Shulke reports graphite pickup and occasional transfer from her Copic nibs. Her account supports checking for drag, without proving permanent nib damage across markers. If the scrap shows unwanted spreading, stop and revise the preparation instead of hiding it under darker color.
An indentation or roughened surface
Inspect the line's surface separately from its color. A groove that remains after lifting deserves a different decision from loose graphite. Erasing more is no demonstrated repair for that groove.
If repeated corrections changed the sheet, consider using a light pad to transfer a clean drawing. Transfer gives you a fresh preparation attempt. Check the transferred marks on the final paper before color.
Ink transfer or marks on the nib
If an ink outline moves, pause that sequence and recheck the exact pen directions and scrap result. Treat ink transfer as its own problem rather than assuming graphite caused it. For a later care decision after pickup, see how to clean alcohol marker nibs.
When preparation is settled, how to color with alcohol markers covers color application. Copic's Coloring Basics, checked October 13, 2026, addresses layering, blending and gradation. It establishes no graphite compatibility result. Pencil finishing after color is a separate task, covered in using alcohol markers with colored pencils.
If You Have Already Colored Over Pencil
“How to erase pencil lines but not affecting the colors?” is an r/Ohuhu reader's question. The difficulty is that correction now takes place on a colored drawing. Community replies offer personal methods, with no guaranteed rescue for your materials.
In her November 29, 2025 Ohuhu review, checked October 13, 2026, Katherine reports failing to erase pencil beneath marker. That result belongs to her drawing and materials. It gives a reason to prepare before color, without establishing universal ink chemistry.
Don't assume stronger rubbing will remove the line and preserve the colored area. Try any contemplated correction on a separate scrap prepared in the same sequence. For the next piece, keep a clean sketch or transfer it before coloring.
Your Sketch Preparation Checkpoint
Before taking alcohol markers over pencil on the final sheet, confirm the intended finish and retain only the guides you need. Compare your first pale pass with clean paper. If marks drag or the prepared surface behaves differently, revise or transfer the sketch before continuing.
Use your scrap record to make that decision. Proceed when the remaining guides, surface and any ink outline suit the drawing you intend to finish.
Sources
- Amy Shulke: Copic Markers Frequently Asked Questions
- Canson: Eraser drawing
- STAEDTLER: Pencils and accessories
- STAEDTLER 5427 eraser
- Ohuhu: How to Make a DIY Spooky Halloween Card
- Sandy Allnock: Blending non-similar Copic colors
- Copic: Coloring Basics
- Katherine Learns Stuff: Ohuhu Alcohol Marker Review